This is Chapter 6 in the series on developing a simple blog on the CMS Grav platform. It’s time to move on to the actual content. How to write it and find photos will be discussed later, as these are separate topics. In this article, I will focus on how to create a page in Grav.
Creating Content in CMS Grav
You’ve already seen the standard editor. Personally, I didn’t like it at all, so you can go to the “Plugins” section and install the TinyMCE Editor. To do this, click the “Add” button in the upper right corner and enter the editor’s name in the filter field.
The TinyMCE Editor Integration plugin will appear, and you can install it. This is essentially the same editor that was previously used in WordPress. You can also use Content Edit, but I didn’t like that plugin at all. In general, there are few alternatives. Leave the TinyMCE editor settings as default.
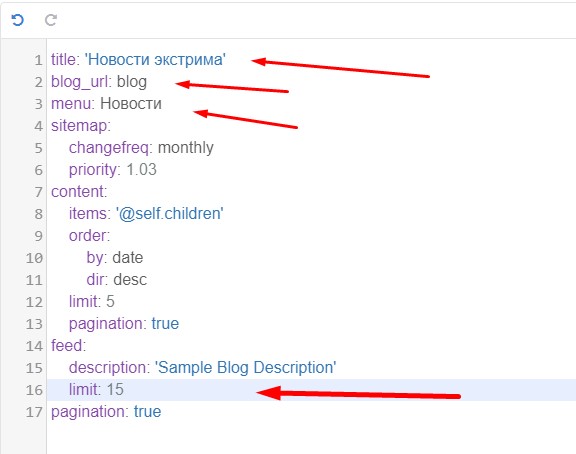
Now go to the pages section. First, open the Blog page. Look at the screenshot below. There are two options:
- Standard;
- Expert.
In expert mode, you can set the page URLs, specify display in the menu, set sitemap settings, and prioritize. You can also set content parameters, pagination options, and the maximum number of posts in the feed.
I changed the title to Russian. I kept the URL the same so that the prefix /blog/ remains before any open news. I also changed the feed limit to 15 news items. Done. By the way, in the standard mode, you can do all this in the “Advanced” tab.
Just below is the “Content” block. A template is responsible for displaying the content on this page, simply displaying announcements on the main page.
In the “Options” section, you can change the following parameters:
- Numeric prefix of the folder. Essentially, the root will contain the folder “01.Blog“.
- Folder name. Pretty self-explanatory.
- Parent. If the page is the main one, the parent will be “root” by default. If you are creating a separate page that should belong to the blog, then set the parent to “blog“.
- Display template. The template responsible for displaying the data on the page. Discussed in the previous article.
- Order. Here you can change the order of the pages.
Saving the changes and moving directly to the content. As you can see, the “Blog” section contains a lot of unnecessary pages. You can edit them, but I prefer to delete and create them from scratch. It will be clearer this way.
In the upper right corner, click the “Add” button, and the “Add Page” window appears. This is exactly what we need.
As you can see in the screenshot, I entered the title, and a new folder where our page will be contained is automatically generated. I selected Blog as the parent page so that the post appears on the main page. Then I chose the Item page template, which is responsible for displaying static content.
First, go to the content section and add the content. You can simply copy and paste the text. If you need to add an image, select Insert → Image. The image must first be uploaded to any folder, and then you specify the path to the media file in the opened window.
In my case: /user/pages/01.blog/roupdzhamping-v-kabanovo-09-06/roup.jpg. Or simply upload it to the attachments located under “Content”.
Next, go to the Options tab. Check the date section and select the desired date, then go to the metadata section, check it, and create the title and description fields. This is in standard mode. In expert mode, do it as I showed above when editing the blog.
In the “Advanced” tab, it is not necessary to change anything. The page is basically ready. I hope I was able to help you. As you can see, creating a page in Grav is not much more difficult than in WordPress. It’s just less familiar. You will be able to quickly create a simple blog that is easy to use.


