Plugin for speeding up WordPress PageSpeed Ninja: instructions and description The PageSpeed Ninja plugin positions itself as a specialized tool for optimizing PageSpeed Insight metrics. But in reality, it contains a set of tools capable of significantly increasing the site’s speed, which is beneficial not only for “search engine rankings” but also for regular live users.
Unfortunately, this plugin is quite demanding for “hands-on” skills to function properly; it needs to be configured correctly. In this article, I will provide a detailed guide on setting up the PageSpeed Ninja plugin.
Everything explained below is applicable to configuring the free version of PSN; the plugin also has a PRO version with much more functionality, but I haven’t thoroughly examined the features of the paid version.
By the way, I recommend downloading only from the official repository at this link: https://ru.wordpress.org/plugins/psn-pagespeed-ninja/.
Settings for PageSpeed Ninja
After installing the plugin, you’ll be prompted to choose one of the configuration modes. To start, I recommend selecting “Safe mode” as it provides minimal interference with the site, reducing the chances of breaking its structure, such as sliders not working, to a minimum. Now let’s proceed to individual settings. I’ll try to break it down for you.
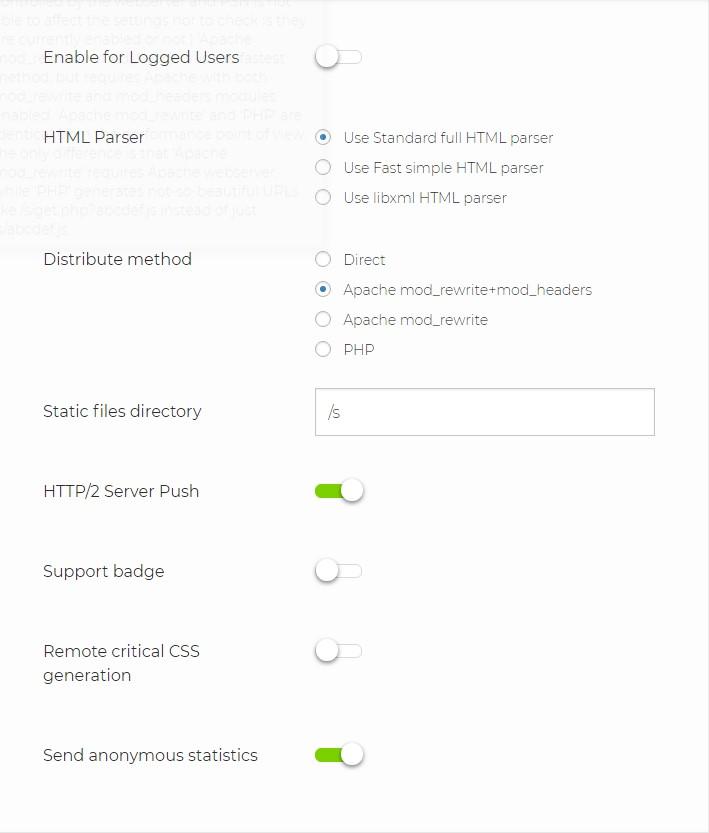
General
Let’s go through each setting individually:
- Enable for Logged Users: This option enables optimization for registered users. If you have regular authorized visitors who are not part of the site’s administration or editors, it’s better to enable this function.
- HTML Parser: Essentially, it determines the type of optimization for the final code. The standard parser is recommended for comprehensive document processing. The other options are not recommended; the second is limited in functionality and strict (cannot work with invalid code and unclosed tags), while the third is designed for XML analysis, suitable only for sites with a corresponding structure (e.g., RSS).
- Distribute method: This setting involves choosing the method of using the plugin’s tools. To put it simply, if you choose the “Direct” method, standard web server settings will be used for caching, distributing compressed files, and compression. Apache mod_rewrite+mod_headers is the fastest method, but these settings must be supported and enabled by the web server. Simply using Apache mod_rewrite is noticeably slower, as it does not add parameters to headers like the previous method. The PHP method generates GET requests constantly, leading to a significant server load. I recommend choosing Direct or Apache mod_rewrite+mod_headers.
- Static files directory: The folder where the cache will be stored. You can change the path if you prefer, but it’s better to leave it as is.
- HTTP/2 Server Push: A special technology that allows sending resources before they are needed by the end agent, provided they will be needed in the future. It’s essentially preloading. I recommend enabling it, but make sure your hosting supports this function first.
- Support badge: A local watermark. A message will be displayed on the site indicating that you are optimizing with the featured plugin.
- Remote critical CSS generation: If you frequently make changes to the site’s styles, it’s worth enabling. In this case, CSS will be generated automatically on an external site. However, I don’t use this feature; I manually clear the cache if necessary.
- Send anonymous statistics: Anonymous statistics on feature usage will be sent to the author to assist in plugin development. Optional at your discretion.
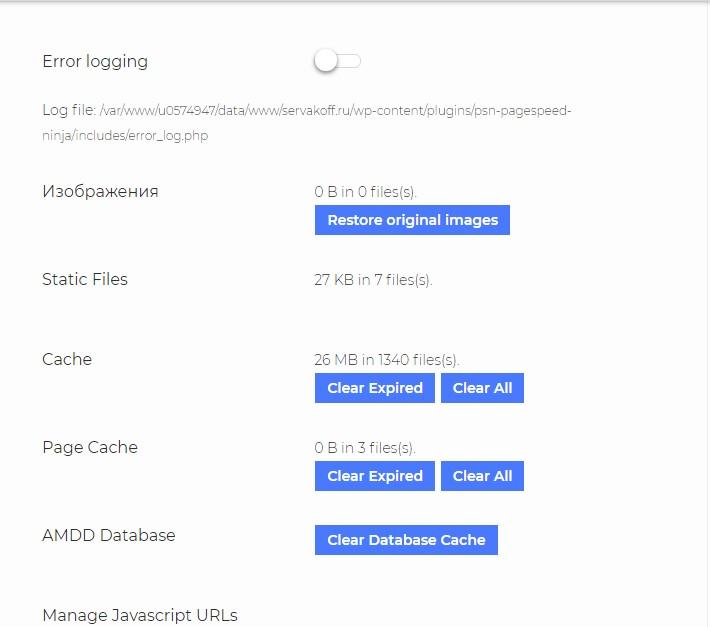
Troubleshooting
The first function enables error logging, helping identify conflicts when using the plugin’s features. It’s a useful tool during the setup stage. Next are the images. If you used the built-in optimizer, you can revert to the originals.
Next, there are caches for static files, pages, and even the database. Facing issues? Made changes? Clear them all. Quite straightforward.
Then comes the “Avoid landing page redirects” function. It’s not necessary to enable it as it hasn’t been implemented yet.
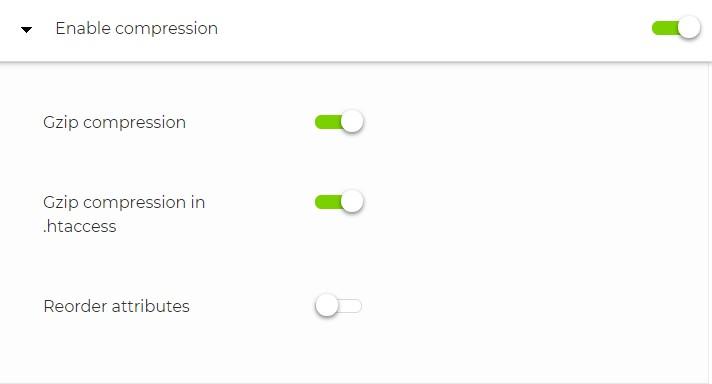
Compression activation. There are only three settings here. The first activates Gzip compression, the second is responsible for activating this mode via the .htaccess file. The third setting overrides HTML attributes for better compression. It’s better to enable only the first two functions. The third one is not recommended, as there is a chance of minor “crashes.”
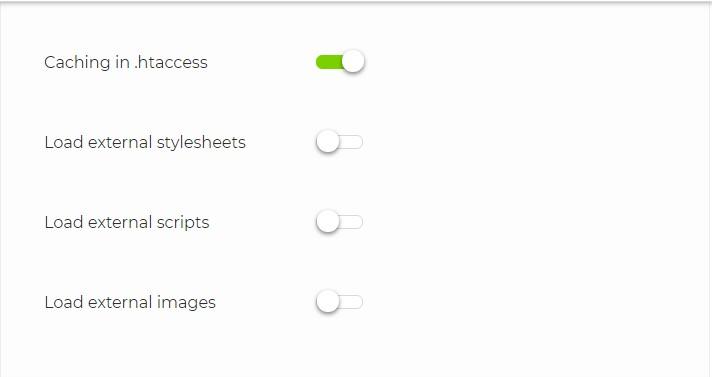
Leverage browser caching
This means utilizing browser caching. The first setting activates caching in the .htaccess file, while the others handle the loading and combining of objects if they are not dynamically generated anywhere:
- Stylesheet files;
- JavaScript files;
- Files and images.
I disable the last three settings because my site has some dynamically generated “codes.” However, they might be suitable for you.
Reduce server response time
This function is designed to reduce the server response time. This setting is intended to activate server-level caching. Caching involves the server delivering already generated static objects. Experimental Caching allows for more efficient cache utilization. But there is a chance of disruptions with this method since it’s labeled experimental.
Next, set the cache lifespan in minutes. Keep in mind that some plugins have built-in “keys” that need to be updated at certain intervals. For example, Caldera Forms; in such cases, do not set it for more than 12 hours.
The last setting, DNS Prefetch, is designed to speed up the DNS lookup for external resources used on the site. It’s a useful function if the site incorporates elements from external sources, such as advertisements, counters, or YouTube videos.
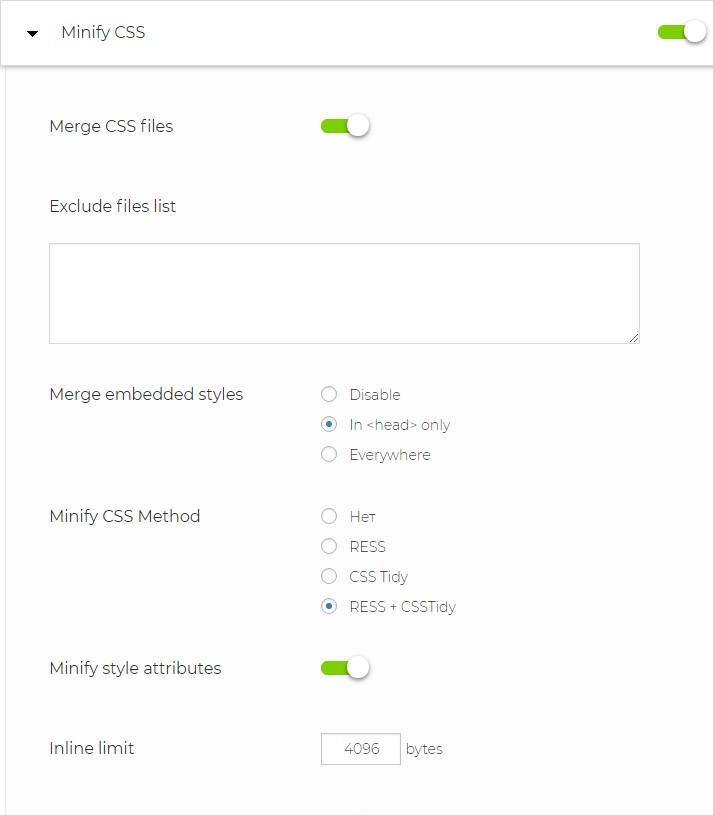
Minify CSS
This section is for compressing style files to reduce the load on CSS files. Here’s the breakdown:
- Merge CSS files: This function allows the PageSpeed Ninja plugin to combine several style files into one. The Exclude files list allows you to exclude specific structures from this process.
- Merge embedded styles: Enables combining styles embedded in the document, such as automatically generated ones. Disable turns off the function. “In head only” allows combining only styles in the head section, while “Everywhere” combines them everywhere. I use it only for headers since dynamic styles in the body can cause conflicts.
- Minify CSS Method: Different methods of compression. Without going into details, RESS is a relatively gentle and conflict-free method, CSS Tidy is a bit more serious, and the last one incorporates positive aspects of both. In case of styling issues, it’s better to disable it.
- Minify style attributes: Compresses attributes. You can use it if there are many embedded “style” attributes; otherwise, the gain is questionable. It works well with dynamic styles.
- Inline limit: Allows embedding CSS directly into the document to avoid additional server requests. Specify the size based on the total volume of loaded CSS.
- Cross-files optimization: Optimizes combined files, effectively attempting to compress the merged file. Enabling this function may cause glitches on the site.
- Keep extra link tag attributes: Does not optimize certain styles if the “link” tag contains additional attributes. It’s a safeguard in case any scripts use a library. It’s better to enable it. The next function is practically similar but pertains to the “style” tag.
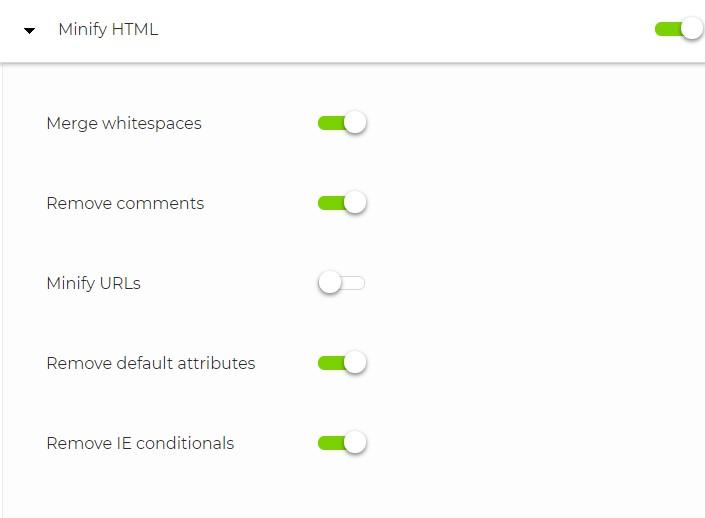
Minify HTML
HTML compression. Here are some useful functions to slightly speed up page loading:
- Merge whitespaces: Removes empty spaces from HTML, essentially spaces and empty lines, which can be quite a few. The gain is not very significant, but it exists.
- Remove comments: Deletes comments from HTML, saving 10-20 KB.
- Minify URLs: Replaces absolute links with relative ones. It’s not recommended to enable this, as the gain is questionable, and it may create problems with external scripts, such as Analytics or Metrics counters. Additionally, it may cause issues with link exchanges since it cuts links to external sites.
- Remove default attributes: Removes attributes with default values where they are unnecessary. Use with caution.
- Remove IE conditionals: Removes comments with Internet Explorer tags from other browsers. The gain is not very significant.
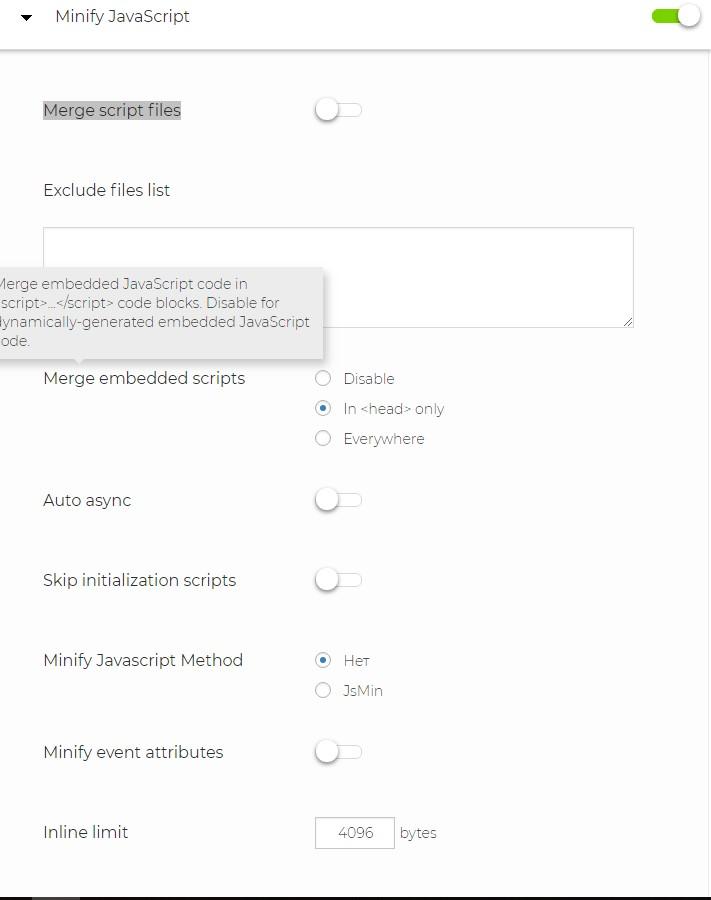
Minify JavaScript
Now, my favorite part – JavaScript minification. Oh yes, there’s so much pain in this! Incorrect use of functions can completely disrupt the site’s structure.
- Merge script files: Combining JS. If you have complex sliders, like Revolution, various preloaders, use this cautiously. It might mess everything up. Below, you can exclude certain scripts from the compression process.
- Merge embedded scripts: Combining scripts embedded in the document. I only use it for headers because ads can be dynamically generated in the body, and this function could lead to conflicts.
- Auto async: Asynchronous loading of JS. Scripts will be loaded in parallel with the document. It’s a cool function but can also cause problems.
- Skip initialization scripts: Allows skipping short embedded scripts. The PageSpeed Ninja plugin won’t include them in minification.
- Minify Javascript Method: JsMin is a quite effective method, but it may not be suitable for sites with a complex script structure.
- Minify event attributes: Minifies event attributes. If you have cross-analytics, connected targets through counters on feedback forms, and the like, it’s better to leave it turned off.
- Inline limit: Allows embedding scripts in the document body with a specified maximum size, reducing the number of server requests.
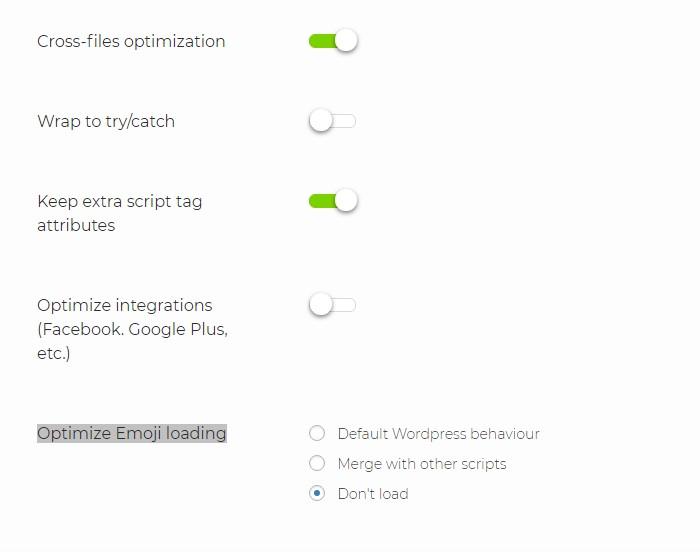
- Cross-files optimization: Optimization of minified files. It’s up to your discretion, but compressing already compressed files is not the best idea.
- Wrap to try/catch: A special wrapper that helps avoid conflicts. Usually, it doesn’t help much.
- Keep extra script tag attributes: Does not optimize certain scripts if the tag contains additional attributes. It’s a safeguard in case any style sheets are linked to a library. It’s better to enable it.
- Optimize integrations (Facebook, Google Plus, etc.): Optimizes integrations with other services. The best way to speed up is to get rid of Facebook; their widgets significantly slow down the site. But if you can’t do without it, you can test this function.
- Optimize Emoji loading: Emoji library. It’s better to turn it off if you don’t use emojis on the site.
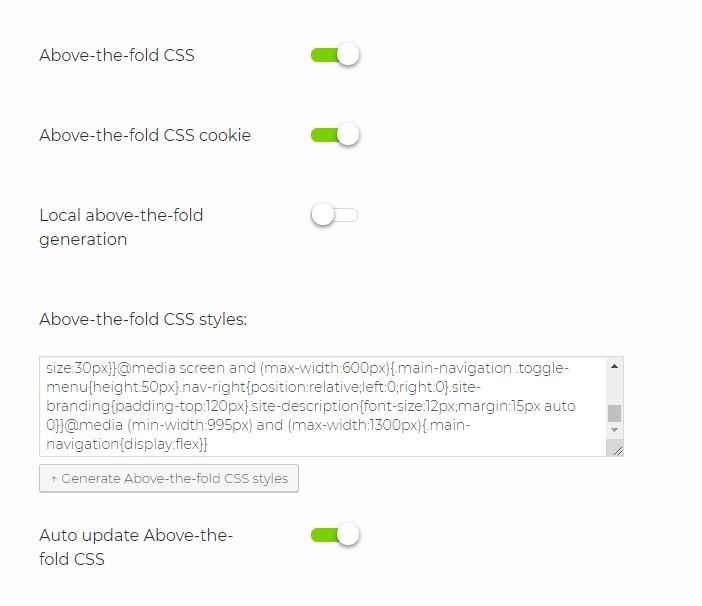
Eliminate render-blocking JavaScript and CSS in above-the-fold content
Eliminates render blocking, meaning the site page will load faster than certain elements on the page load. In order:
- Above-the-fold CSS: Styles for the top part of the page.
- Above-the-fold CSS cookie: Allows using cookies to embed styles.
- Local above-the-fold generation: Allows generating data locally or on an external server.
- Above-the-fold CSS styles: Intended for manual generation of top part styles.
- Auto update Above-the-fold CSS: Enables automatic updating.
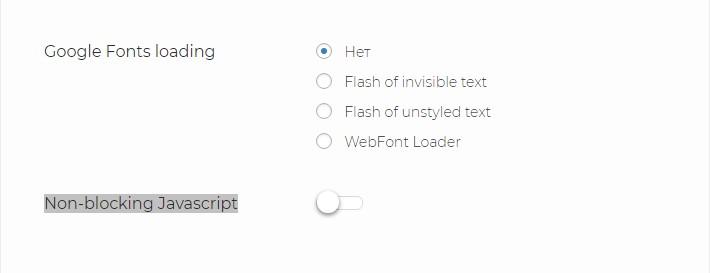
Google Fonts loading. Here we’ll take a closer look. “Flash of invisible text” won’t display text until the required fonts are loaded. “Flash of unstyled text” allows displaying text with default fonts until the required fonts are loaded. WebFont Loader allows loading fonts asynchronously using the webfonts.js library. If you have Google fonts, it’s better to choose “Flash of unstyled text.”
The last function is Non-blocking Javascript. It allows loading the document ahead of scripts and, after a few seconds delay, loading all JS. It negatively impacts display, can conflict seriously, and might disrupt counters.
In general, I decided to disable this section altogether. There’s a speed gain, but the site will look very plain for the first few seconds. Conflicts, unloaded scripts, and other issues are also not favorable.
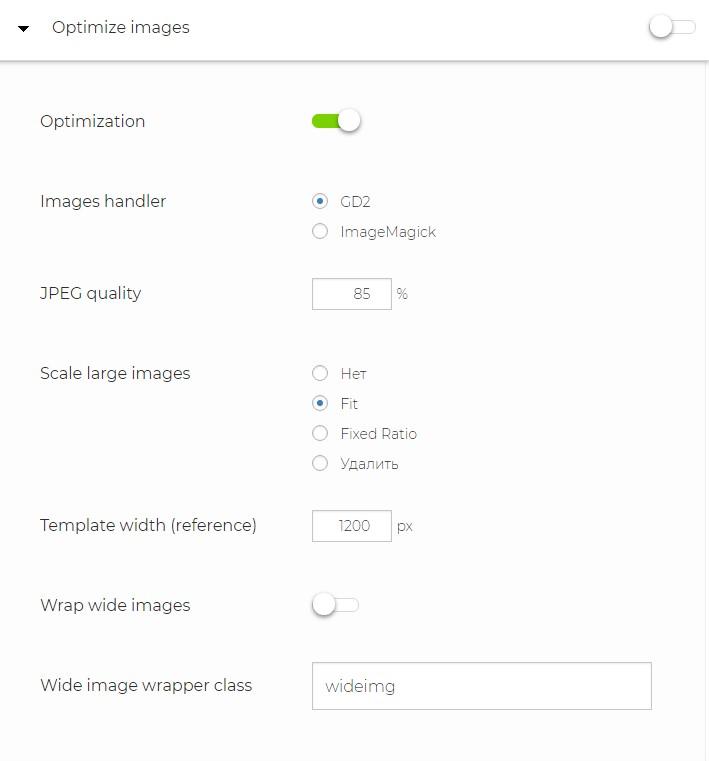
Optimize images
Allows optimizing images. I can’t say anything substantial here. I use another plugin for these purposes. However, it compresses images quite effectively. The rescale tag can also be added. If you don’t want to clutter plugins, you can use it.
The plugin also added functionality for converting images to WebP, which is very convenient. You won’t need to install third-party plugins for this task.
Prioritize visible content
Give priority to visible content. It’s quite straightforward:
- Lazy Load Images: Delays the loading of images until they are needed and within the visible area.
- Lazy Load Iframes: Delays the loading of frames, for example, ad banners, until they are scrolled to.
- Low-quality image placeholders: Uses low-quality image fillers, for example, for thumbnails.
- Vertical lazy loading threshold: Essentially, the offset. If there are 40 pixels left until an image or frame, it will start loading. You can specify your pixel value.
- Skip first images: Skips the loading of the first images (lazy loading does not apply to them).
- Noscript position: Honestly, not sure why this is needed, only if for images wrapped in <nosript>
- Generate srcset: Automatically generates the srcset attribute for resized images.
Miscellaneous
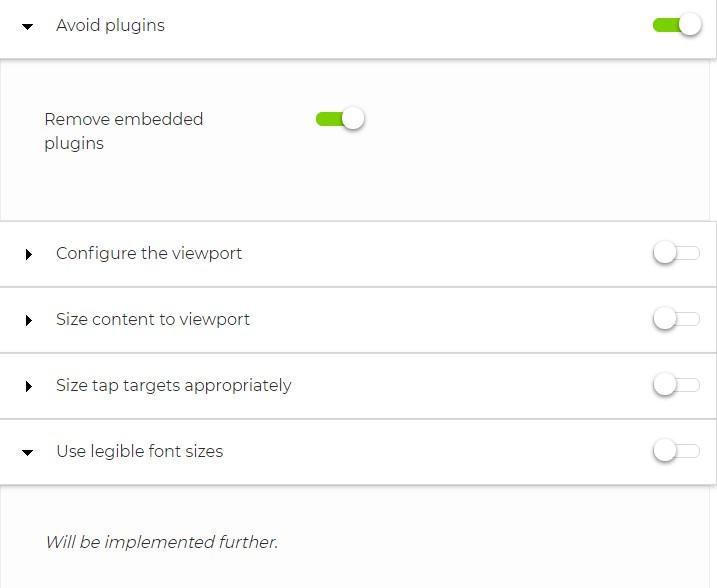
Avoid plugins: Allows removing built-in plugins, such as Flash, ActiveX, Silverlight. In case of conflicts, it’s advisable to disable this.
Configure the viewport: Width of the viewport. To use default screen parameters, set the value to 0.
Other functions are not yet implemented; we await further updates. I hope this has helped you understand this complex plugin. Keep in mind that I didn’t delve into the details of each function, as each deserves a separate article, but I’ve provided recommendations, making it much easier to comprehend. Use PageSpeed Ninja wisely. If curious, you can search for information on each specific function; many of them are quite intricate, but with proper understanding, you’ll have an excellent tool.
My PageSpeed Ninja Configuration
Here’s a configuration that causes few issues when using the plugin. You can try it; the functionality might not be at its maximum, but the site won’t suffer from potential problems.
Functions not displayed can be simply turned off as they are not needed. Regarding HTTP/2 support, check with your hosting provider; if it’s not supported, never enable this function under any circumstances.


