Hello, ladies and gentlemen. This article is prepared especially for you. I will explain how to create a child theme in WordPress, providing a detailed step-by-step guide. I’ve also included a video, but working with the textual material may be more convenient, as you can easily copy the entire code and make slight adjustments to fit your needs. Alright, let’s get started with creating the Child Theme.
WordPress Child Themes and Their Purpose
Let’s first talk about why child themes are needed in the first place. Most WordPress users choose themes from the official repository. This approach has serious advantages and some drawbacks. However, the advantages outweigh the drawbacks, making the repository an extremely useful resource.
Themes from the repository are created by third-party developers who monitor the code and update the themes.
Suppose you decide to adjust the template, make some changes, and add GA code to functions.php. Everything works perfectly! But at a certain point, you notice that there is an update available for the theme.

You click the “Update Themes” button, wait, and suddenly discover that the edited template has reverted, and all custom codes from functions.php have disappeared.
Yes, that’s exactly what happens; the update can replace manually edited files with updated versions created by the theme author.
There are two ways to avoid this:
The bad way is to fork the theme. In other words, take the theme, detach it from the repository, but then the problem of updates and maintaining the code’s relevance falls on you. You’ll have to thoroughly understand the theme and then support it independently. In general, it’s easier to develop a theme from scratch for yourself.
The good way is to create a child theme.
Within the child theme, you can modify template files and add custom codes without fear of losing your work. Let me demonstrate with a simple example.
Let’s say I installed a theme, looked at it, but didn’t like the link in the site footer, so I decided to remove it.
Find the code of this link in the footer.php template file.
Assuming I found the necessary code and removed the link. A month later, I updated the theme, and the old link is back in the footer.
Okay, removing one link is not difficult, but if you have many customizations, it’s better to do it right from the start.
To do this, create a child theme and add the modified template with the code to it.
Now the corrected template will be connected, and the link in the footer will no longer bother us.
Everything is fixed, everything works. The key is to follow the syntax.
The same goes for custom functions. Decided to add favicons through functions.php? Why not! In the child theme, you can add your own functions.php, which, unlike templates, doesn’t completely replace the file from the parent theme but complements it.
Decided to create your own styles? Great! We have a style.css file for that, where you can make your changes without worrying about losing them during an update.
As you can see, child themes are necessary, so don’t hesitate to create them if you plan to use a theme regularly and make your own modifications to it.
Creating a Child Theme for WordPress
So, I’ve explained why it’s necessary to create a child theme, and now let’s go over how to create one. In this case, there are two options: a straightforward method using a plugin and a more complex method, which involves manual creation without using plugins. I’ll provide detailed instructions for both approaches, but I recommend the second method only if the first one doesn’t work.
Creating a Child Theme with a Plugin
This is the easiest method. For this, we’ll need the Child Theme Configurator plugin, which you can install from the WP repository: https://ru.wordpress.org/plugins/child-theme-configurator/. To install, go to your site’s admin area → “Plugins” → “Add New.” Simply find the plugin through the search. “Add New.” Just find the plugin you need via search.
After installation, activate the plugin. Now go to the “Tools” section → “Child Themes.”
Now we have several options:
CREATE a new Child Theme: This means creating a new child theme, and this is the option you need to choose.
CONFIGURE an existing Child Theme: Some themes are initially child themes. For example, when installing one of the VW VW themes, you may encounter this. This option allows you to configure someone else’s child theme.
DUPLICATE an existing Child Theme: Create a complete copy of the child theme.
RESET an existing Child Theme (this will destroy any work you have done in the Configurator): Used to reset a child theme.
Now choose the first option, then select the parent theme. Click the “Analyze” button.
After the analysis, you should see a message indicating that this theme allows the creation of a child theme.
If it doesn’t appear, for example, if you initially have a child theme for some popular theme, this plugin may not be suitable. It’s better to avoid such themes altogether; they come with many issues.
Now, perform the following actions:
Name the new theme directory: Specify the name of the directory for the child theme. The easiest is to use the theme name + child. Write in lowercase Latin characters, and use a hyphen instead of a space. For example, my-theme-child.
Select where to save new styles: Choose the Primary Stylesheet (style.css) by default. This means using the style.css of the child theme to write styles. Choose another option only if you want to combine all CSS into a separate file later.
Select Parent Theme stylesheet handling: Choose “Use the WordPress style queue.” This means the order of style loading is determined by WP.
Customize the Child Theme Name, Description, Author, Version, etc.: Specify the attributes of the child theme in this order: theme name, its website, author, author’s website, description, tags, version. In principle, automatic generation is fine for me.
Copy Menus, Widgets and other Customizer Settings from the Parent Theme to the Child Theme: If you’ve worked with the parent theme, for example, configured menus, added widgets, check the box to copy the settings to the child theme.
Click the “Create New Child Theme” button.
That’s it, the theme is created. Now go to “Appearance” → “Themes” and activate it.
Done, if you wish, you can disable the plugin and continue working manually, but you can also work with the child theme through the plugin interface.
However, I never got used to it and do everything manually, but believe me, using this plugin is no worse than manual work, even faster and more convenient.
If, for some reason, the plugin couldn’t create a child theme, you can try doing it manually. But honestly, if the plugin couldn’t handle this task, it’s probably better to change the theme, as the problem lies precisely with it. And even with manual creation, you’ll encounter a range of issues.
I’ve also attached a video tutorial.
Creating a Child Theme for WP Without Plugins
I often resort to this method, mostly out of habit. However, it involves performing many actions. It’s not complicated, but it can be a bit tedious:
you’ll need to do everything manually, such as creating directories;
syntax errors can render the child theme non-functional;
it will take more time than installing a plugin;
Now let’s move on to the process itself.Creating a child theme always starts with forming a directory.
The simplest way is to create a child theme on your local computer, pack it into an archive, and then upload this archive to the hosting through its interface or via FTP.
Let’s take the example of the Colibri WP theme. Here’s the straightforward approach:
Identify the directory name of the parent theme and copy it.
Create a directory, paste the copied name, and add “child” with a hyphen.
Done.
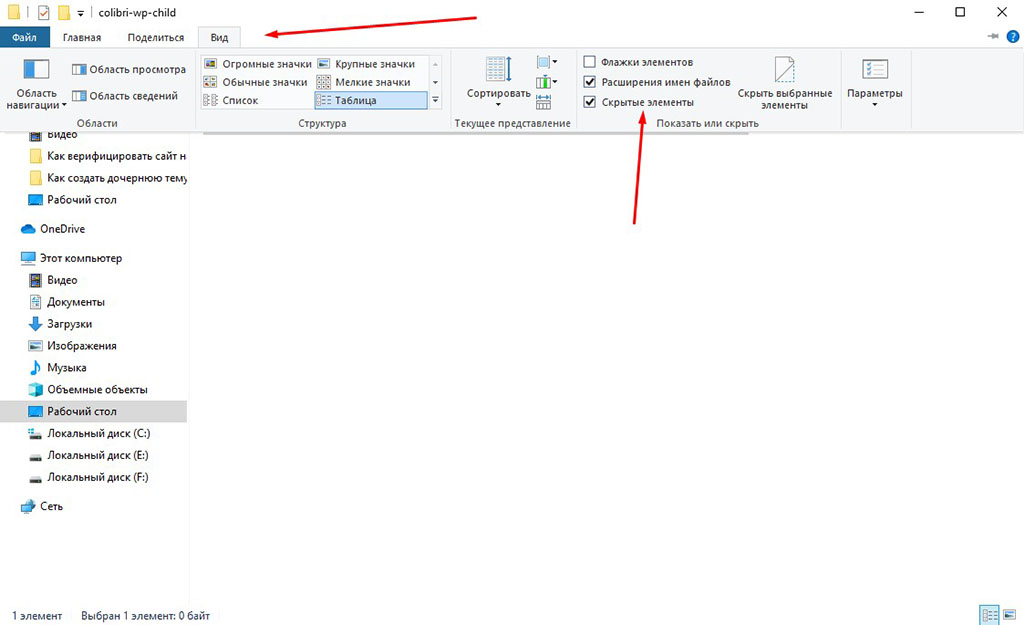
Now you need to create a new text file. Name it style.css. Change the extension from txt to css. If you don’t see the extension and you’re using Windows 10-11, go to the “View” tab and check the checkboxes shown in the screenshot.
Now you can open the file and start editing it. It’s best to use the Notepad++ editor; it’s an excellent tool with syntax highlighting, and if you make a mistake, Notepad++ will point it out. Don’t hesitate, download it.
In the style.css file, enter the following commented block:
/*
 Theme Name: Colibri WP Child
 Theme URL: https://workinnet.ru
 Description: Моя дочерняя тема
 Author: Puchlik Svirepiy
 Author URL: https://workinnet.ru
 Template: colibri-wp
 Version: 1.0.0
 Text Domain: colibri-wp-child
 */
Now let’s break down what each part means:
Theme Name: Specify the name of your child theme. You can name it as you like.
Theme URL: Any URL; it’s essentially the address of your theme’s page. You can specify your website.
Description. The theme’s description; write anything you like.
Author: The name of the theme author or a nickname.
Author URL: The website address of the theme author. You can specify your website.
Template: The name of your parent theme. Specify the name of the directory where the parent theme is located. Do not provide the full path, only its name.
Version: The theme version. You can change it along with changes in the theme and maintain it with GIT GIT concurrently. Convenient.
Here, by the way, is the catalog name I used to specify theTemplate parameter when generating the child theme.
Text Domain. I’ve highlighted this separately because it’s an important parameter for localization. Suppose you installed a theme, translated it into your language, and added it to the child theme.
In essence, if we specify the name of the child theme in the Text Domain, the localization files from it will take precedence over those in the parent theme folder. So, if you plan to translate the theme yourself, be sure to specify the name of the child theme.
If you specify the parent theme, the translation files will be taken from it, and what is in the child theme will be ignored by WordPress.
Almost done. In principle, only a directory with the style.css file inside is needed to create a child theme. Everything else is optional. Make sure to enclose all the mentioned details within a comment between two slashes.
/*
сюды пихаем содержимое
*/
In CSS, these notations are needed for commenting.
But let’s complete it to make everything proper. In the same directory where you placed the style.css file, create a new file and name it functions.php.
Open it with Notepad++ and add the following code block:
<?php
add_action('wp_enqueue_scripts', 'winnet_theme_styles' );
function winnet_theme_styles() {
	wp_enqueue_style('parent-theme-css', get_template_directory_uri() .'/style.css' );
	wp_enqueue_style('child-theme-css', get_stylesheet_directory_uri() .'/style.css', array('parent-theme-css') );
}
Save the file and close it. This code is necessary to load the styles of the parent theme.
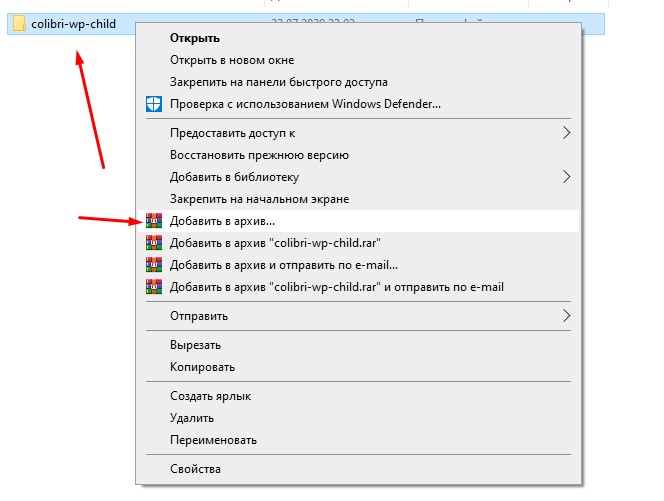
Great, you’ve just created a child theme without a plugin. Now you need to upload it to the hosting. To do this, zip the directory (specifically the directory!) where you created the files with a .zip extension. You can use another format if your hosting supports it. You can do this using WinRAR. However, ZIP can also be created using Windows tools.
Now open the file manager on your hosting or connect to it via FTP.

Unzip it on the hosting. The main thing is that the folder with your child theme is in the themes directory.
Done, just one final touch. Go to the admin area of your site → “Appearance” → “Themes.” Choose the child theme and click the “Activate” button. Check its functionality.
Excellent!
If you don’t see the theme among the others, scroll down a bit. You might notice that the theme may be marked as damaged.
Most likely, this is due to an incorrect name specified in the Template in the style.css file. Sometimes it may happen that the parent theme does not allow the creation of a child theme. In that case, it’s better to change the theme.
I’ve also attached a video tutorial.
Happy working!
I hope I was able to clearly explain how to create a child theme on WordPress. Believe me, it’s better to do this; it will noticeably simplify your work. If anything is unclear, feel free to ask questions in the comments, and I’ll try to respond promptly.
On that note, I wish you success and productive coding!


