Feedback forms are an important element of a website. It is their completion that can be the most important element in the existence of a website. Unfortunately, almost all feedback forms for WordPress are sharpened to track Google Analytics goals. I wasn’t happy with that arrangement, especially because I really like Webvisor. In some aspects, Metric is much more convenient than Google’s analytics software suite.
The only one where I was able to set up Metrics tracking without problems is the Contact Form 7 plugin. I never managed to do tracking in the Caldera Forms plugin, I messed around for a few days and gave up on it. But in Ninja Forms I managed without problems, although I had to apply one more crutch in the form of a separate plugin. Let’s cut to the chase. Today I’m going to tell you how to set up Metrics goals for Ninja Forms.
Metrika-targets
So, in order to accomplish this task, we will have to perform a number of more difficult actions than for the analogous task in CF7. Ninja Forms is originally honed for Google Analytics, which is not surprising. That’s why I approached the solution creatively, because all the hooks are available. However, the Caldera forms are also present, but that didn’t help.
First of all, I started with the trivial option. I decided to create the required function and connect it via functions.php.
The code looked like this:
add_action( 'wp_head', 'metrika_target', 10, 2 );
function metrika_target() {
?>
<script type="text/javascript">
    jQuery(document).ready(function() {
    jQuery( document ).on('click', '#nf-field-12', function() {
    ym(12345678, 'reachGoal', 'targetwn'); return true;
    });
});
</script>
<?php }
Dirketywa:
?>Closes the PHP block, followed by the script. After the script code is complete, reopen the PHP block with the directive:
<?phpА after putting a bracket like“}” to complete the action.
From the point of view of the code everything is correct. #nf-field-12 is the id of the button, clicking on the button with this id triggers the ReachGoal function, which sends the event to Metrics. Unfortunately, I haven’t found the ability to trigger the event when the form is submitted yet, but when I figure out how to do it, I’ll post it.
Unfortunately this code didn’t work, I decided to dig around and look for solutions. Unfortunately, detailed instructions were nowhere to be found, but some texts prompted an option.
Implement Metrics goal tracking in Ninja Forms
So, the option was simple as hell. If you can’t connect via functions.php, you can do without adding a function, because you can use a plugin that can hook the javascript file separately.
So, the baseline. WordPress version 5.1, Flexia theme. The rest of the plugins don’t count. NF installed.
So, the form is created. We define its ID in this way:
Place the form on the desired page. A draft is fine, too.
Open the desired page and go into developer mode. To do this, press F12. Either (works for Chrome browser), right click on the submit button and look at the code.
Finding an idi in the right place. Shown in the screenshot below.
Done.
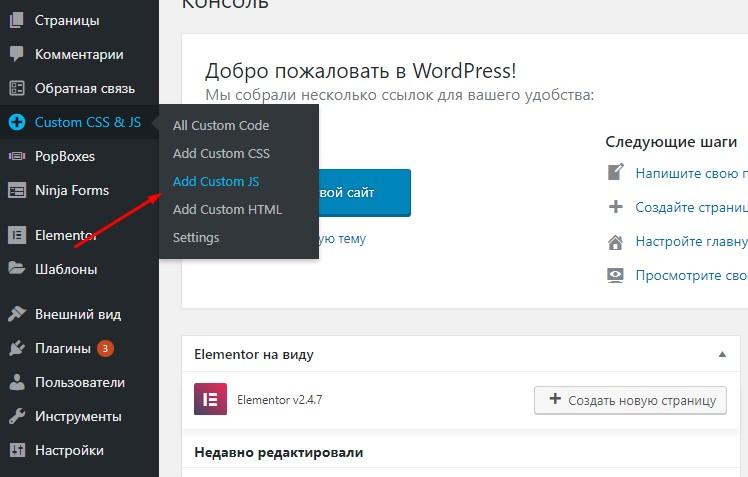
Next, install the Simple Custom CSS and JS plugin. It will allow you to hook up external js code and execute the function embedded in it. Open the plugin settings and add custom javascript code, the screenshot shows where to push it.
Now it’s time to add our script. Let’s take a look at the screenshot.
First of all, we enter the name. Next, we choose the type and location of the location:
Linking type select Internal. That means internal code.
Where on page specify header. That is, the code will be placed in the header. If you do the same in the footer, there is a chance that when you click, the goal fulfillment will not be counted.
Where in site select “In Frontend“. Accordingly, the code will be executed within external functions. That is, at the level of the topic.
Next, we place our code. Let me explain what he means. After the Metric update, the ReachGoal code looks like this:
ym(12345678, 'reachGoal', 'targetwn'); return true;Where ym is a function defined in the meter code, 12345678 your Metric number, “targetwn” is the name of the target you are creating.
By the way, making a goal is easy. Go to Yandex Metrics → click “Customize” → select the “Goals” tab → click “Add Goal” → then select JavaScript event → enter a name → click “Add Goal” again. Done, the name and will be the identifier of the event in the future.
That’s it, the event is there, add the below js code to the document:
jQuery(document).ready(function() {
jQuery( document ).on('click', '#nf-field-00', function() {
    ym(12345678, 'reachGoal', 'targetname'); return true;
    });
});
Replace the button id with your own, Metrics data similarly. The task is almost complete. Publish the file and click on Activate. From this point on, you can track Ninja Forms events for Metric. I clicked the right button on the page and the goal was scored.
It’s nothing complicated
If you like forms with a visual constructor and a large number of functions, NF is better than CF7. As you can see, the goals are pretty easy to customize. If there will be many forms, you don’t need to create a separate script for each event, just copy the lines:
jQuery( document ).on('click', '#nf-field-00', function() {
    ym(12345678, 'reachGoal', 'targetname'); return true;
    });
Insert before the previous target code, but change the data to the desired data. Not as easy as I’d like, but it’s already possible to work with it. Best of luck to you, I hope setting up Yandex Metrics goals in the Ninja Forms plugin won’t cause any problems.


